Annual Sale : Get upto 75% off on your Annual Subscription
Get it now
Get upto 75% off
Buy now Documentation

Cache settings of plugin helps you to add expires headers to various types of resources.
For adding expires headers to any resource type you need to select box of infront of that resource type and switch on main category of that resource.
for example:- if you want to enable expires headers for png file types
- you need to check checkbox infront of png.
- enable switch Image.
- After that you need to specify expire time in days for that perticular category in this case Image.
- Hit Submit button at the end to save changes.

Minify Settings
Plugin offers minification facility which reduce total page size and also reduce http requests on server for loading page which helps to improve performance of website and results into speed optimization.
CSS Minification
Enable CSS Settings: this option help you to enable start processing and merging of css files. Along with that it will act as switch to enable of disable all following CSS related settings.
Enable CSS Minifcation: It will minify all non minified css files before merging them to file.
Inline Footer CSS: It will inline all small css files which is less than 20 kb and listed as footer css files.
JS Minification
Enable JS Settings: this option help you to enable start processing and merging of js files. Along with that it will act as switch to enable of disable all following js related settings.
Enable JS Minifcation: It will minify all non minified js files before merging them to file.
Enable Deferring Processed JS Files: It will start defer parsing of all processed js files.
Skip Deferring jQuery: It will stop deferring jQuery files because in some themes and plugins deferring jQuery cause issue so better to avoid deferring jQuery files.
Other Options
Enable HTML Minification: This option will enable minification of HTML and hence reduce size of data require to load page.
Inline Google Fonts: This option inline google fonts and hence reduce number of server request which help page to load faster.
Escape Admin Users in Minification Process: This option is specially provided for fixing backend and frontend editior which can be damaged if used along with minification. So this option will help plugin to identify that when it needs to load minified processed files and when to not.
Prevent these resources from processing during minification process: There will be chances that some of files are important to theme and plugins you are using and if we add them to minifaction process it will brake UI of website so we need to avoid them during minification process. You need to comma seprated list of files to prevent them processing during minification process.

External Resources
This feature helps to add expires headers to most of external resources (resources not hosted on current website hosting or third party resources). By doing so we can improve website performance by lowering number of external resources require to load website. It will also refelect as speed improvement in webslite loading time.
Here are details how you make this work.
- First time when you open “External Resources” Tab you may not see any external resources. For that follow the steps for finding external resources on home page. Open home page of website in new tab. once home page is completed loading then refresh the current plugin setting page.
- now you have list of external resources on home page of website.
- Once you have resources list you can now cache them for adding expires headers. So click on button Start/Refresh Cache External Cache. It will cache all external resources. Once resources cache successfully every resources have “✓” mark at right of resources given name by code. If any resource not have “✓” mark in this case hit Start/Refresh Cache External Cache again it will cache all resources again unless there is issue in caching some resources.
- Now you have 2 buttons under every external resources they are linking origional resource and cache resource. Check both files by clicking both button it will open resources in new tabs. If both are same you are ready to add expires headers to external resource by switching lever to on inline of buttons. Repeat same process for every other resources on page. If resources have differences in cached version and orional version do keep switch off and try caching resources again it may fix issue if not keep that perticular resource switch off. Once you finish seeing all resources and choosing once which have origional and cached version same you can hit submit button to make changes saved.
- Import Notice :- Do not add expires headers to dynamic external resources ( resources which are frequently updating by themselves ) otherwise it may cause issue to website.
If caching any external resource brake your website or creating problems just come back to this tab and make all resources switch to off and hit submit. It bring back website in it’s standard condition as it was at start.
Then enable single resource at a time and check website how it functioning after checking this for all external resources you can find problem causing resource and now you can avoid it by keeping its switch to off.

Lazy Loading Settings
Enable Lazy Loading
Activating this toggle enables all lazy loading features across your website. Lazy loading defers the loading of images, videos, iframes, and other heavy media until they appear in the visitor’s viewport. This significantly improves initial page load times, reduces bandwidth usage, and boosts Core Web Vitals (LCP and FCP). Disabling this option reverts to standard media loading behavior.
Lazy Load Images
When enabled, images are loaded only as users scroll and they come into view. This reduces initial page size, speeds up the first paint, and minimizes server load. Ideal for pages with numerous images, galleries, or long content sections. The feature ensures images appear seamlessly as visitors navigate the page.
Lazy Load Iframes
This option delays the loading of embedded content such as YouTube videos, Google Maps, or other iframe-based embeds until they are visible on the screen. It prevents unnecessary data fetching for off-screen embeds and greatly improves Time to Interactive (TTI) and page responsiveness.
Lazy Load Videos
Loads HTML5 videos only when they enter the user’s viewport. This prevents large video files from being fetched during the initial page load, resulting in faster rendering and reduced data usage. Especially useful for media-heavy landing pages or blogs containing multiple video sections.
Lazy Load Background Images
Defers loading of heavy CSS-based background images until the section becomes visible. This is particularly effective for large background banners, parallax sections, or hero areas. It ensures a faster first contentful paint (FCP) and prevents unnecessary resource downloads for content below the fold.
Lazy Load Shortcodes
This option delays the execution of specific shortcodes until they are visible on the screen. It helps optimize performance for shortcode-generated content such as sliders, forms, or embedded dynamic widgets that typically load scripts or assets on initialization. Useful for improving render speed on shortcode-heavy pages.
Lazy Load Widgets
When enabled, widgets are loaded only when needed (as they appear in the viewport). It prevents unnecessary script execution for widgets placed below the fold, ensuring the above-the-fold content loads first and remains fully interactive without delay.
Custom Shortcodes to Lazy Load
Allows you to specify custom shortcodes (e.g., [gallery123], [form]) that should be lazily loaded. You can add or remove shortcodes using the provided field. This setting offers fine control over performance optimization for specific plugin or theme shortcodes that load heavy assets or dynamic content.
Exclude Critical Elements
Specify CSS selectors or post IDs (comma-separated) for elements that should not be lazy-loaded. For example: .logo, #hero-banner, .important-class. This ensures essential site visuals such as logos, headers, or hero images load immediately and remain visible during the initial render, avoiding layout shifts or blank placeholders.
Enable Responsive Image Support (srcset/picture)
When enabled, the plugin supports responsive image markup using <srcset> and <picture> elements. This ensures the browser loads the most appropriate image size for the visitor’s screen, saving bandwidth and improving performance across devices. It works seamlessly with lazy loading to deliver fully optimized, adaptive images.
Animation on Load
Choose how images and media appear once they load. Options include:
None – Instant display without animation.
Fade In – Smooth opacity transition.
Slide from Bottom / Right / Left – Directional entrance animation.
Animations enhance user experience and make content loading feel more natural.
Custom Placeholder Image
Upload or specify a custom placeholder image (e.g., loading spinner or blurred thumbnail) to display before lazy-loaded media becomes visible. This helps maintain layout structure and improves perceived performance by visually signaling that content is loading in the background.
Save Settings
Clicking Save Settings applies and stores all changes made on this page. All lazy loading features and advanced options will take effect immediately after saving. Always save your configuration to ensure that updates persist across reloads or plugin updates.

Image Optimization Settings
Enable Image Optimization
This toggle activates or deactivates the image optimization feature globally. When enabled, the plugin automatically processes images according to the selected format, quality, and size rules. Disabling this option pauses all optimization activities without deleting existing optimized files. This is useful for troubleshooting or when testing changes without reprocessing all images.
Image Format
Choose the preferred optimized image format between WebP and AVIF.
WebP offers excellent compression and broad browser support.
AVIF provides even smaller file sizes with better image quality but may have limited compatibility in older browsers.
Your selected format will be used for all future optimizations and automatic conversions.
Image Quality
This setting controls the balance between image size and visual quality. The value ranges from 1 (lowest quality, smallest file) to 100 (highest quality, largest file).
A mid-range setting (e.g., 70–80) is recommended for maintaining sharpness while significantly reducing file size. Adjust based on your site’s design needs and available bandwidth.
Max Width and Max Height
Define the maximum dimensions for optimized images. Images larger than these values will be resized proportionally without distortion. This ensures large uploads don’t unnecessarily consume bandwidth or storage.
For example, setting Max Width = 1980px and Max Height = 1980px suits most modern displays while keeping performance optimal.
Optimize All Image Sizes
When enabled, the plugin optimizes every image variation generated by WordPress (thumbnail, medium, large, and custom sizes). This ensures consistent quality and smaller file sizes across all versions used throughout the website, including featured images, galleries, and widgets.
Delete All Image Sizes When Main Image Is Deleted
Automatically removes all optimized and resized versions of an image when its main/original file is deleted. This helps maintain a clean and lightweight uploads directory by preventing leftover files from occupying unnecessary storage space.
Convert Images Automatically on Upload
Automatically converts newly uploaded images into the selected optimized format (WebP or AVIF) based on your settings. This ensures all future uploads are immediately optimized without requiring manual action, keeping site performance consistent over time.
Email Optimization Status After Auto Runs
Enables email notifications summarizing the results of automatic optimization tasks. The report typically includes details like the number of images optimized, total space saved, and any failed items. Ideal for monitoring background processes and ensuring ongoing optimization efficiency.
Exclude Specific Image IDs
Enter comma-separated image IDs (e.g., 23,45,67) to exclude them from optimization. This is useful for images that require original quality, such as brand logos or detailed graphics. The excluded images will remain untouched during both manual and automatic optimization processes.
Auto Re-run Optimization
Schedules recurring background optimizations at a chosen interval — Every Day, Every Week, or Every Month. The plugin automatically rechecks and reprocesses images if needed. Select Never to disable scheduled optimizations. Useful for maintaining image health and performance consistency over time.
Batch Size
Specifies how many images are processed in each optimization batch (10–100). A lower number reduces server load and ensures stability on shared hosting, while a higher number speeds up bulk optimization on more powerful servers. Choose a value based on your hosting environment.
Batch Interval
Determines the time delay between consecutive batches (1–10 minutes). Increasing the interval reduces CPU load and server stress during large-scale optimizations. For smaller sites, a shorter interval (1–2 minutes) provides faster completion; for larger sites, longer intervals improve stability.
Save Settings
Click this button to apply and store all configuration changes. The plugin will use the saved preferences for all future optimization processes, both manual and automatic. Always ensure to save after any adjustment to prevent loss of new configurations.


Bulk Image Optimization
Optimized Images
Displays the total number of images optimized out of the total available. For example, 77/77 means all uploaded images have been optimized successfully. This helps you monitor progress during large-scale optimizations or reversals. The counter updates in real time as images are processed, ensuring you can track exactly how many have been completed versus pending.
Size Reduced
Shows the total disk space saved through optimization, expressed in megabytes (MB). This metric helps you understand the overall storage and bandwidth benefits achieved from image compression. A larger reduction indicates higher efficiency in optimization, contributing to faster page loading and reduced hosting costs without compromising image quality.
Images Processed
Indicates the total number of image variants handled during optimization — including main uploads, thumbnails, medium, large, and custom sizes. This number may be higher than your total uploaded images because WordPress generates multiple sizes for each image. It gives an accurate view of the total optimization workload completed by the plugin.
Optimization Runs
Tracks the number of complete optimization sessions executed. Each time you perform a full or partial optimization, this count increases. It provides insights into your optimization activity frequency — useful for monitoring automated cron runs, testing sessions, or manual operations conducted for maintenance or performance improvements.
Start Bulk Optimization
Begins a full-site image optimization process in the background. The plugin automatically processes all unoptimized images, converts them to the chosen format (WebP/AVIF), and applies your configured settings such as size limits and quality levels. The operation runs in batches to maintain server stability and supports live progress updates for transparency.
Start Reversing Optimization
This action restores all optimized images to their original versions. It’s useful when testing or verifying visual quality after optimization, or if you need to regenerate uncompressed images. During reversal, the plugin deletes optimized files and restores backups or original images, with live progress feedback shown in the interface.
Cancel Operation
Allows you to safely stop any ongoing optimization or reversal process mid-way. Once clicked, the plugin pauses background processing and ensures no further images are altered. Ideal for preventing server overload, addressing configuration mistakes, or pausing bulk tasks during peak traffic periods without affecting completed operations.
Reset Operation
Resets the current optimization or reversal task, clearing temporary logs and progress indicators. This does not delete optimized images but resets the session data, allowing you to start a new operation cleanly. Use this option when restarting bulk tasks after an interruption or configuration change.
Progress Bar
Visually represents ongoing optimization or reversal progress. It updates dynamically with each processed image and displays numerical completion status (e.g., “40/77 images reversed”). This real-time progress indicator helps you estimate remaining time and confirm that operations are running smoothly without needing to reload the page.
Operation Logs
The log area displays detailed records for each processed image, including actions such as “Optimized Image deleted” or “Image regenerated.” These logs provide full transparency for debugging, verifying successful processing, and troubleshooting failed optimizations. You can scroll through the logs to view per-image outcomes and timestamps.
Support Button
Opens a direct link or support panel for reaching the plugin’s help team. You can report issues, request guidance, or check documentation updates related to bulk optimization and reversal processes. This ensures users can quickly resolve questions or technical problems without leaving the admin area.

Advance Settings
Plugin offers certain advance settings which help you to enhance speed of page if used in proper way. In this section of plugin settings you can also add more type of files for adding expire header in cache settings.
Removing Version Info From Files: This will remove version info details from resources which may help to increase chances of caching file for longer period of time. Make sure you understand feature before implementing it.
Unset Entity Tags (ETags): Enabling this feature helps to unset entity tags or Etags for resources which improve cache performance and lead to better speed optimization.
Enable HTTP(Gzip) Compression: Enabling this feature help to initiate HTTP(Gzip) compression of files and content which helps to improve page loading speed of website. Before enabling this feature make sure your server supports compression or not.
Refresh Cache Periodically(beta): Enabling this feature helps to refresh browser cache periodically and helps keep cache updated on user side.You can choose refresh frequency from dropdown list below switch.
Prevent Resources from Cache: This Pro feature help to prevent specific resources from caching on browser. Enter list of resources you want to prevent from browser cache using comma separated list.
Add New File Types for Cache: This pro feature helps to add custom file types for adding expires headers.
- For supporting new/custom file type other than which already provided you need Go to Advance Settings of plugin
- Scroll down to Add New File Types for Cache.
- Choose Proper Mime Type and File extension name without “.” at start.
for example:– for adding .png file support you need to choose Mime type image and in file extension you need to write png and hit submit button to save changes. - once this changes in advance settings are successfully saved you need to go to cache settings of plugin and check for newly added custom file type.
- check box in front of newly added file type and hit submit button.
- that’s completed process for adding new/custom file type support for adding expires headers.
Please click here. For list of mime type and custom post type(file extension).
License & Account
Where is my License Key for Pro Plugin ?
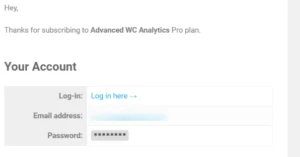
Once you successfully placed order for your pro plugin you will receive your license key in your registered email.

You will also receive credentials for your freemius account in email. Login to your account where you also get License key for Pro plugin.
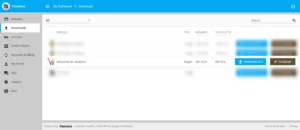
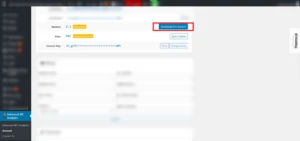
If you upgraded plugin from your wordpress website backend you will find License key in account link under plugin menu as shown below.
Let us know if you still need any assistance for finding license key for your pro version of plugin.
Where is my Latest Pro Plugin Files ?
Once you upgrade to pro version you will receive email containing login credentials to freemius as shown below
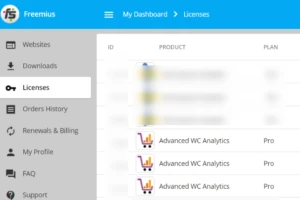
Once you login to your freemius account you will find menu options named as Downloads.Click that menu link where you can find option to download latest files for pro version of plugin as shown below.
If you upgraded to pro version to plugin from backend of your website you can get your pro plugin files from your account page under plugin main menu as shown below.
How to manage my account and subscription for plugin?
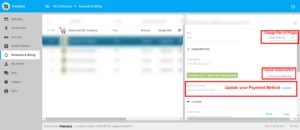
For Managing your account subscription, you need to login to your buyers account at freemius using crdentials you have received on your registered email address while purchasing pro version of plugin as shown below.
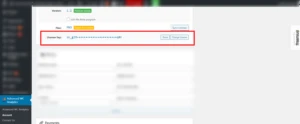
Once you logged in your freemius account click menu link named as Renewals and Billings.Once you click on link you will be have different renewals information will be displayed and you can perform action such like changing current plan of plugin, cancel current subscription, updating payment methods and others as shown in below in screenshot.
After purchasing Pro Version of Plugin, I have not received any License Key or Account Credentials.
Any very rare cases above issue arise.(Mostly when payment fails or not processed successfully) In this case you need reach out to us using this link. Here you need to specify your registered email address, your name, website url and date & time of your purchase.
After receiving your information we will check details with our records and if your paymnet processed and you have active subscription of service we will provide you license key and pro files via secure download access.